What Happens Between Spray Foam and Drywall in Oklahoma
TL;DR
Spray foam does not go straight from the gun to the finished wall. After application, the foam must cure for at least 24 hours, then the excess that expanded past the stud faces is shaved flush; the debris is vacuumed up, thickness is verified at multiple points with a depth gauge, the installation is visually and physically inspected for defects, fire-retardant coatings are applied where required, and the building inspector signs off before the drywall crew can begin. This finishing sequence is the quality checkpoint that determines whether the insulation behind your walls will perform for decades or create problems you will not discover until the drywall comes back off. Most homeowners never see these steps. Understanding them helps you know what to expect and what to verify on your own project.
Step 1: Curing (24 Hours Minimum)
After the foam is sprayed, the chemical reaction between the A-side and B-side components continues as the foam expands, hardens, and reaches its final physical properties. This process is called curing, and it must be complete before any trimming, inspection, or covering can happen.
Most manufacturers specify a minimum of 24 hours cure time before the foam can be trimmed or disturbed. During this period, the foam is still chemically active. Cutting into uncured foam releases volatile compounds, produces an uneven cut, and can compromise the cell structure at the cut surface.
The EPA requires that occupants and non-crew workers remain out of the treated space during curing. Your contractor should communicate the specific re-entry time based on the product used and the conditions on the job. For more detail on re-entry timing, see our guide: How to Prepare for Spray Foam Installation.
Nothing else happens during this period. The foam sits undisturbed, and the building is vacant. This is not wasted time. It is the chemical reaction completing.
Step 2: Trimming and Shaving the Excess Foam
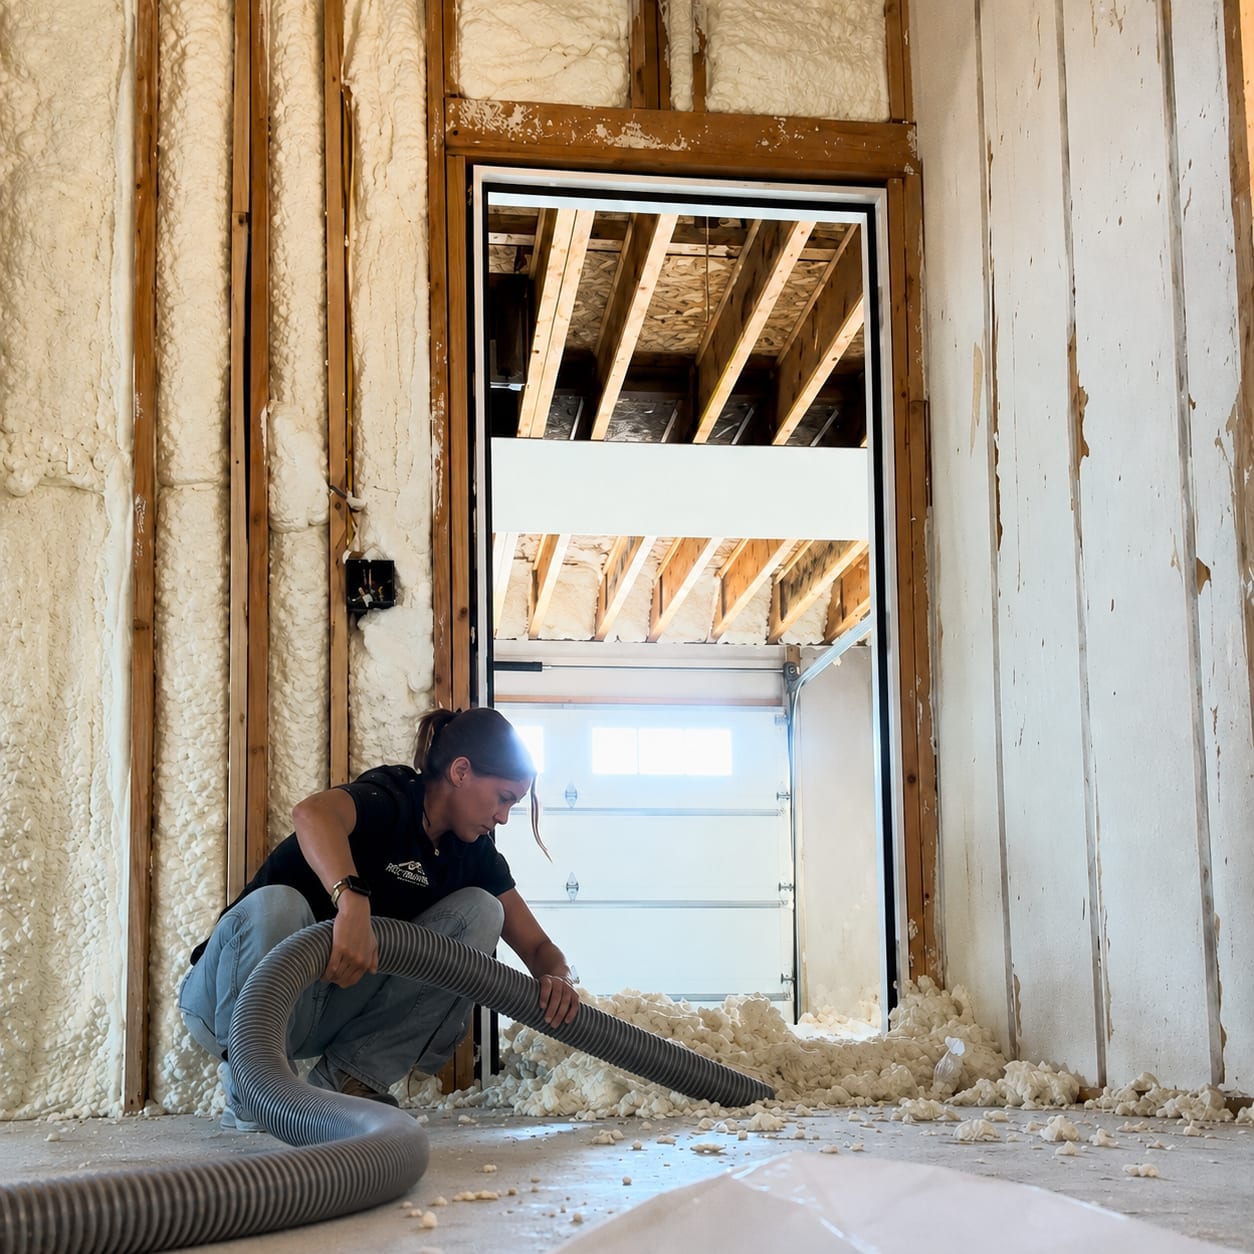
This is the step the hero image on this blog shows, and it is the one that surprises most homeowners who see it for the first time.
Professional spray foam installers intentionally overfill wall cavities and ceiling bays. The foam is sprayed past the face of the studs and joists to guarantee complete coverage with no voids, thin spots, or gaps at the framing edges. Once cured, that excess foam must be removed so the surface is perfectly flush with the stud faces. If it is not flush, the drywall cannot sit flat against the framing, and you get bulges, gaps, and fastener problems in the finished wall.
The trimming method depends on the foam type. Open-cell foam expands roughly 100 times its liquid volume, which means it overflows the stud cavity significantly and requires substantial trimming. Open-cell is soft and relatively easy to cut with a long serrated knife, a reciprocating saw with a flexible blade, or a specialized foam saw. The installer uses the stud face as a guide, running the blade along the framing to shave the foam flush.
Closed-cell foam expands only 35 to 50 times its liquid volume and is much denser when cured (approximately 2 pounds per cubic foot vs. 0.5 for open-cell). Skilled closed-cell installers try very hard not to overfill stud cavities because trimming dense foam is extremely labor-intensive. When closed-cell does need trimming, it requires power tools: reciprocating saws with specialized blades or angle grinders. Hand tools are inadequate for the density.
The key detail: the trimmed surface must be completely flush with the stud face across the entire wall. Any high spots prevent the drywall from sitting flat. Any gouges below the stud face leave voids behind the drywall that reduce R-value at that point. A clean, consistent trim is a sign of professional workmanship.
Step 3: Vacuuming the Debris
Trimming produces a large volume of foam waste. Open-cell shavings are light and fluffy. Closed-cell shavings are denser chunks. Both must be removed from the work area completely.
This is not just housekeeping. Foam debris left on the floor, on horizontal framing members, or inside mechanical chases creates problems for every trade that follows. Electricians stepping on foam chunks risk slipping. Drywall crews cannot set bottom tracks or floor plates on a debris-covered surface. Plumbers need clean access to their rough-ins.
The crew vacuums the shavings with industrial vacuum equipment, bags the waste, and clears the space so it is clean and ready for the next phase. The image on this blog shows this exact step: the installer collecting the trimmed open-cell foam from the floor after shaving.
Step 4: Thickness Verification
After trimming, the installer verifies that the foam meets the specified thickness at multiple points across the installation. This is the measurement that determines whether you got what you paid for.
The American Chemistry Council's inspection guidance states that the contracted and specified thickness must be documented. A probe or depth gauge is pushed into the foam at the trimmed surface to measure the depth from the face to the substrate behind it. Measurements should be taken at a minimum of three locations per wall assembly, focusing on corners, around penetrations, and at transitions where thin spots are most likely.
For Oklahoma homes, the thickness target depends on the foam type and the assembly. Two inches of closed-cell foam in a wall delivers R-13, meeting the 2015 IECC wall requirement. A full 3.5-inch cavity of open-cell delivers approximately R-13 as well. On attic roof decks, R-38 requires significantly more depth depending on the foam type.
If any area measures below the specified thickness, additional foam is applied to that spot before the wall is closed. This is the last opportunity to correct thin spots. Once drywall covers the foam, verifying thickness requires destructive testing (cutting holes in the finished wall), which nobody wants to do.
A good contractor measures, records, and shares the results with you during the post-installation walkthrough. A contractor who does not verify thickness is not verifying their own work.
Step 5: Visual and Olfactory Inspection
With the foam trimmed and measured, the installation gets a full visual and sensory check. The ACC inspection guidance recommends a qualitative visual, tactile, and olfactory inspection of the overall project. Here is what is being checked:
Color consistency. Properly cured foam is a uniform cream or off-white. Blotchiness, dark patches, or amber streaks indicate potential off-ratio mixing. Color variation across a single wall is a flag that chemical temperature or pressure drifted during application.
Surface texture. The trimmed surface should be consistent. Open-cell foam has a soft, porous texture. Closed-cell has a firmer, smoother texture. Areas that feel significantly softer, harder, or stickier than the surrounding foam may indicate localized curing issues.
Adhesion. The foam should be firmly bonded to the substrate at every point. If any section pulls away from the sheathing or framing when pressed, there is an adhesion failure that must be addressed. For a detailed explanation of what adhesion failure looks like, see our guide: Common Spray Foam Installation Mistakes.
Odor. At 24 hours post-application, there should be little to no chemical smell in the work area. A faint residual odor is normal and dissipates quickly. A strong, persistent chemical smell (fishy, sweet, or acrid) at this stage indicates a potential off-ratio issue that must be evaluated before the wall is closed. Sealing off-ratio foam behind drywall traps the problem inside your wall permanently.
Cracks or voids. The trimmed surface may reveal internal cracks from lifts that were applied too thick or voids where the foam did not fully expand into a cavity. Small voids can be filled with a touch-up pass. Deep cracks may indicate a more serious curing issue.
Step 6: Fire Barrier Application (Where Required)
Building codes require spray foam to be separated from occupied spaces by a thermal barrier or ignition barrier. In most wall assemblies, the drywall that goes on next serves as the thermal barrier. No additional coating is needed.
In locations where foam will remain exposed after the project is complete (attics accessed only for utilities, crawl spaces, garages without finished walls, metal buildings), an intumescent fire-retardant coating is applied over the trimmed foam surface at this stage. The coating must be applied at the manufacturer's specified wet film thickness, measured with a gauge during application, and allowed to dry before any further work or inspection.
This step happens after trimming and before the building inspector's visit so the inspector can verify that the fire barrier meets code.
Step 7: Building Inspection and Sign-Off
In new construction and most permitted renovation projects, the building inspector must approve the insulation before drywall can be installed. The inspector checks for code compliance: correct R-value for the climate zone and assembly, proper foam type, fire barrier where required, and overall coverage.
For projects that include a HERS rating, the HERS rater conducts a separate quality verification visit at this same stage. The rater checks insulation installation quality against the energy model and may flag areas that need correction.
This inspection window is critical. Once the inspector signs off and the drywall goes up, the insulation is buried permanently. Any defect discovered later requires removing finished surfaces to access the foam. Every step before this point (curing, trimming, verifying, inspecting) is designed to catch problems while they can still be fixed easily and inexpensively.
What to Look for During Your Walkthrough
Your contractor should invite you to walk the project after trimming and before drywall. Here is what to check:
Every stud bay is filled. Look for any cavity that was missed or only partially filled. There should be no visible substrate through the foam on any exterior wall.
The foam is flush with the studs. Run your hand across the wall. You should feel a smooth transition from stud face to foam face with no high spots or deep gouges.
Consistent color and texture. The foam should look the same everywhere. Any area that is significantly different in color or feel from the rest deserves a question.
No strong chemical smell. If you smell something strong and chemical at this stage, ask about it before the wall is closed.
Thickness gauging. Ask to see the depth measurements. A contractor who measured and recorded them will show you. A contractor who did not measure cannot verify the work.
Ready for a Spray Foam Installation That Is Done Right Through Every Step?
At Rocking Rad Spray Foam LLC, we do not call a job finished when the gun stops spraying. We cure, trim, vacuum, verify thickness, inspect for defects, apply fire barriers where required, and walk the project with you before drywall goes up. Every step is part of delivering insulation that performs for the life of your building. Free on-site estimates and 0% financing available across Oklahoma. Contact us or fill out our online form to schedule yours.
Frequently Asked Questions
How long does the trimming and cleanup process take?
For a typical residential project (1,500 to 2,500 square feet of wall and ceiling area), trimming, vacuuming, and verification add roughly half a day to a full day after the foam has cured. Open-cell foam requires more trimming time than closed-cell foam because of the greater expansion. The total time between spraying and being ready for drywall is typically two to three days: one day for application, one day for curing, and half to one day for finishing.
Can I do the walkthrough myself, or do I need an inspector?
You can and should walk the project yourself. Look for consistent coverage, flush trimming, uniform color, and no strong odors. A building inspector checks for code compliance. A HERS rater checks for energy performance quality. Your own walkthrough checks for anything that does not look or smell right. All three serve different purposes, and none replaces the others.
What happens if a problem is found during inspection?
If thin spots are found, additional foam is sprayed to bring those areas up to specification. If adhesion failures are found, the delaminated section is cut out and re-sprayed. If off-ratio foam is detected (color, odor, texture issues), the affected area may need to be removed and re-applied. All of these corrections are far easier and cheaper to do before drywall than after.
Does closed-cell foam need trimming too?
Rarely. Skilled closed-cell installers deliberately underfill the cavity slightly to avoid the need for trimming because the dense, rigid foam is very difficult to cut. If closed-cell does need trimming, it requires power tools (reciprocating saws or grinders) rather than the hand tools that work on open-cell. A small amount of touch-up trimming at stud faces is common, but large-scale shaving like what open-cell requires is unusual for closed-cell installations.
Why does the foam expand past the studs in the first place?
Intentional overfill guarantees complete coverage. If the installer tries to spray exactly flush with the studs, any slight underfill leaves a void or thin spot at the stud edge that reduces R-value and air sealing at that point. Slightly overfilling and then trimming back ensures every square inch of the cavity is fully insulated with no gaps. The trimming step is planned, not a mistake.
Are there financial assistance programs for insulation in Oklahoma?
There is currently no federal tax credit for residential insulation. The Oklahoma Department of Commerce Weatherization Assistance Program provides no-cost energy efficiency improvements to qualifying households. Some Oklahoma utilities offer rebates for insulation work. Check with your provider for current options.